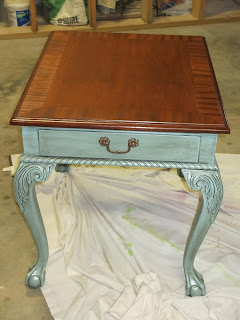
After!
This color seems to be everybody's favorite. Everything I have done using this combination of paint and antique glaze sells really quickly!
The table was in good shape to start with. Just some scratches on the top. The top has a thin laminate over wood. I have found that if you are really careful, you can sand the topcoat off the laminate and get rid of most, if not all, the scratches. You do have to be very careful because you can sand right through the laminate if you are not careful.
After sanding down the top i picked out a pretty color of stain, This one is a little red, which matched the table perfectely. TIP,,,Dont sand the edges of the top! It is just too hard to get around all the edges. If they are in pretty good shape, you can stain to match the top.
While that is drying, I used a liquid sanpapaper and cleaned all the bottom of the table. Everything you are planning to paint. This will leave you a sort of sticky feel that the paint will adhere to.
It dries fast, and really saves tons of time and work! After that I used a primer. I dont always prime everything, but if you are going to really be using the table and it is a really nice piece of furniture I would prime. Especially with this newer furniture. The finish can be really hard. The last thing you want is to spend all your time painting and it just chip off... very bad.
This is really good stuff! Let it dry! Probably best to wait overnight.. Then pick your paint, I use an eggshell finish. I got this fabulous color at Lowes. I will have to get back to you on the color... I didnt write it down..One great thing Lowes will do for you, is keep up with all your paint colors for you. You get a card that they scan when you check out, and next time you go back, they can look up all your purchases. Really nice!
I used 2 coats. Let that really dry. If you don't, the paint will soak up way too much of the glaze and be too dark...
Get some glaze....
I brushed it on. I wanted to get in all the detailing on the table. You can work with it for a few minutes, so take your time. I did one section at a time so it wouldnt dry our too fast.. Like one leg at a time. Take a clean dry cloth and wipe the glaze off. This is personal preference. Take as much or a little as you like. You cant really mess up, unless you start going back and re wipe places that are dry. You can spritz with a little water, and wipe again if you wait too long.
After it dries, Paint the whole table with a coat of polycrylic. You might want to put two coats on the top. Let dry completely in between!
Love!


